The complete formation list and guide for FIFA 17. The following formations are available in FIFA 17 Kick Off, Career and Ultimate Team modes accessible from Team Management menu.
The formation list in FIFA 17 Ultimate Team is slightly different than in FIFA 17, check out the available formations in FIFA 17 Ultimate Team here at www.fifplay.com/fut-17-formations
FIFA 17 Formation List
| 3-Defender Base | 4-Defender Base | 5-Defender Base |
|---|---|---|
3-1-4-2

Mode: Attacking / Midfield (Moderate)
Suitable for the games you're trying to win and you need to concede no or less goals same time.
3-1-4-2 is a variation of 3-5-2 formation where a defender (preferably a sweeper) helps midfielders on attack and defence. Like in 3-5-2, this formation is heavily reliant on the wing-backs providing width for the team. The wing players are more withdrawn in favour of one of the central midfielders being pushed further upfield into the playmaker position.
3-4-1-2
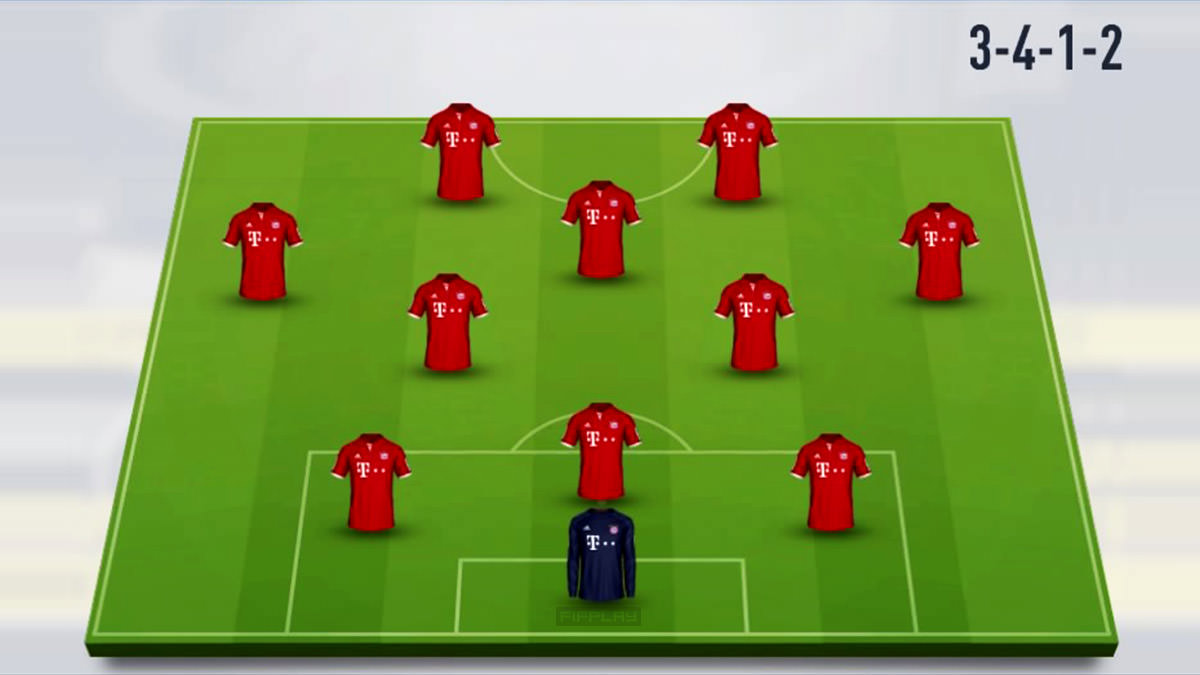
Mode: Attacking (Moderate)
Suitable for the games you are trying to win by keeping the ball in the middle and creating oppurtunies by your midefielders
3-4-1-2 is a variation of 3-5-2 formation where the wing players are more withdrawn in favour of one of the central midfielders being pushed further upfield into the playmaker position, the "number 10". This formation is suitable for the games you are trying to win by keeping the ball in the middle and creating oppurtunies by your midefielders.
3-4-2-1
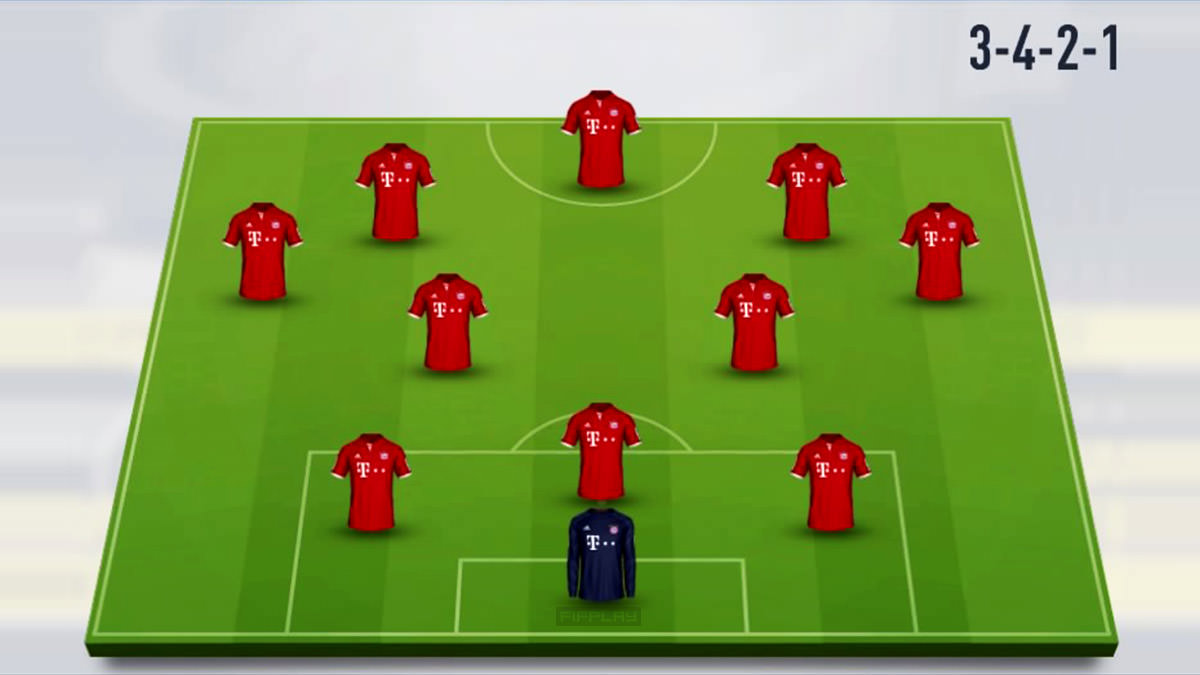
Mode: Attacking
Designed for the games you want win and also score more goals.
A variation of 3-4-1-2 formation but more attacking. 3-4-2-1 has more attackers (3 forwards – LF, CF/ST and RF) and is designed for the games where you are not only trying to win the game but also trying to score more than one goal.
3-4-3 Flat
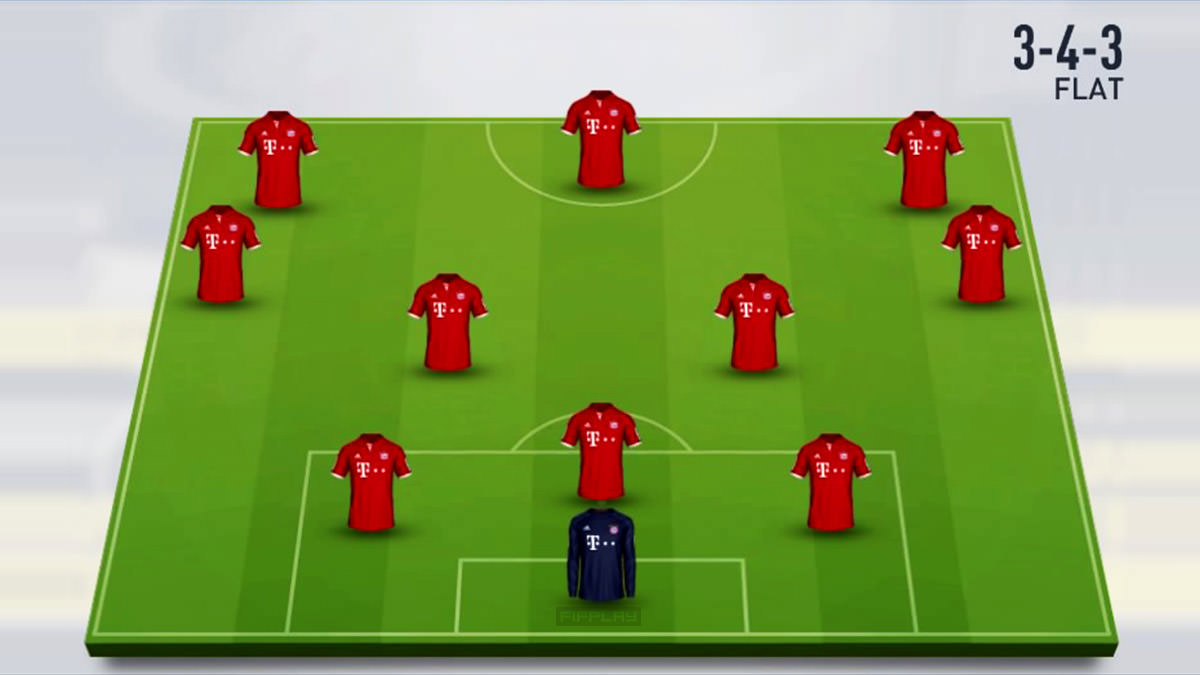
Mode: Attacking
Suitable for the games where you want to concentrate on attacks and score goals.
Using this formation, your midfielders are expected to split their time between attacking and defending. Having only 3 defenders means that if the opposing team breaks through the midfield, they will have a greater chance to score than with a more conventional defensive configuration, such as 4–5–1 or 4–4–2. However, your 3 forwards allow for a greater concentration on attack. This formation is used by more offensive-minded teams.
3-4-3 Diamond
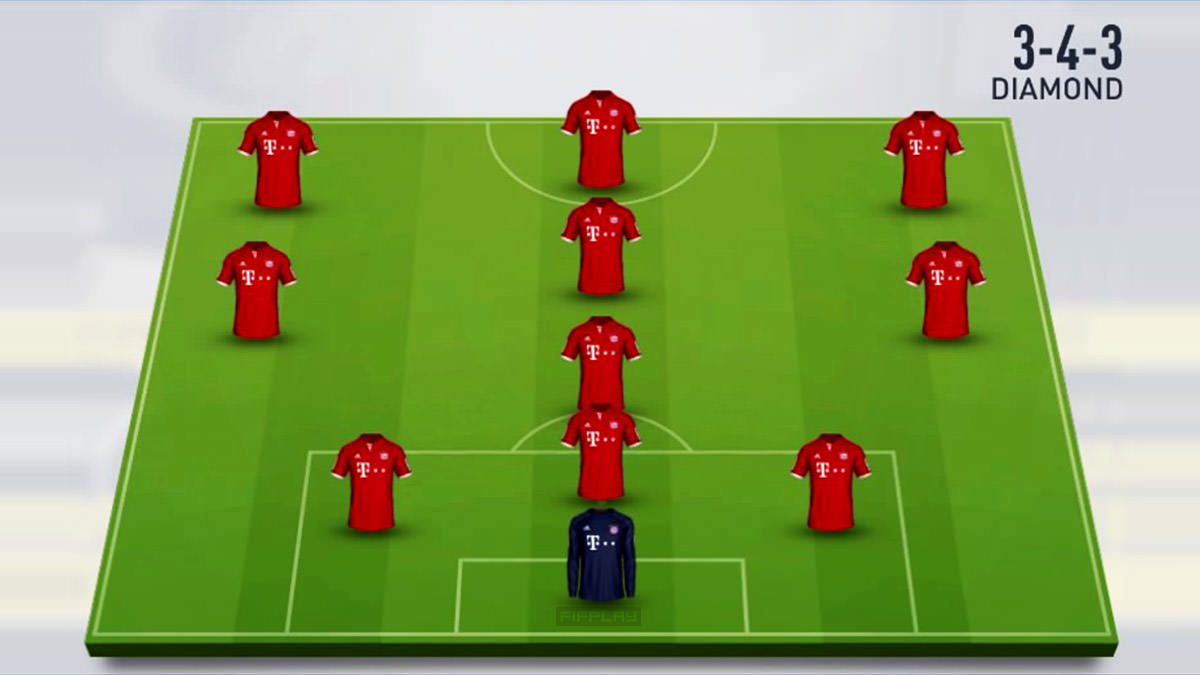
Mode: Attacking
Suitable for the games where you want to concentrate on attacks and score goals and same time concede no or less goal.
Same as 3-4-3 Flat, but in 3-4-3 Diamond formation you have a CAM and a CDM instead of two CM players, so it helps you be better on attacks and defences.
3-5-2
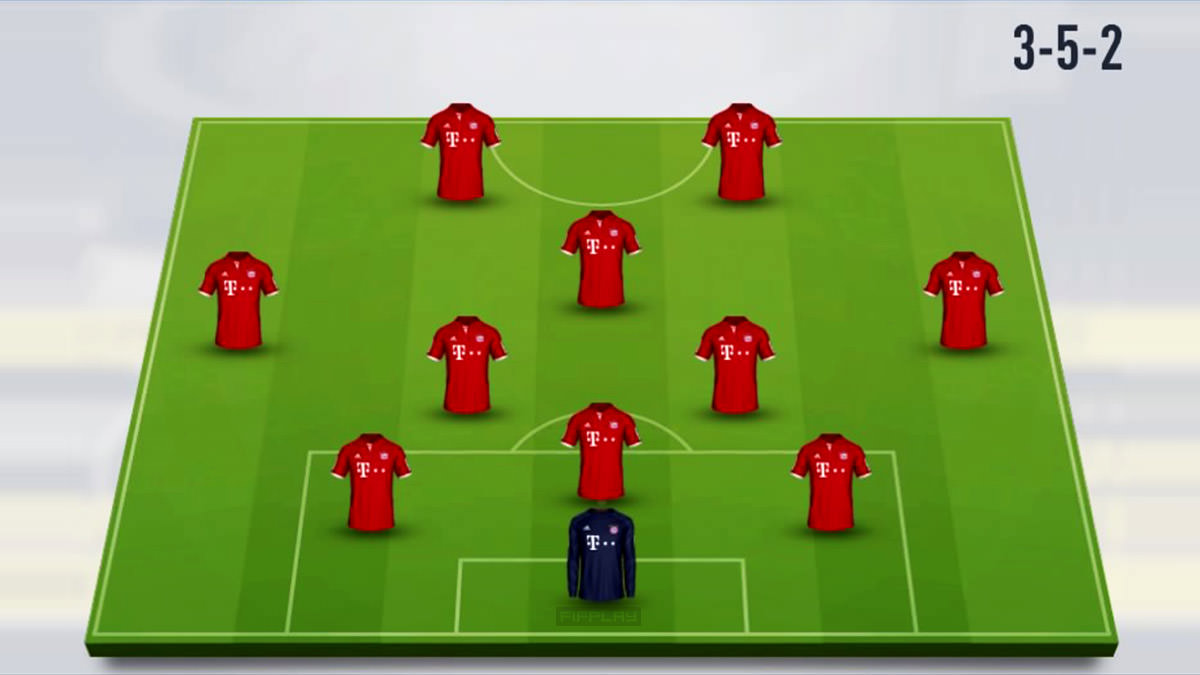
Mode: Attacking (Ball Possession)
Suitable for the games where you want to concentrate on attacks and score goals and same time concede no or less goal by keep the ball possession.
3-5-2 formation has 3 central defenders (possibly with one acting as a sweeper.) This formation system is heavily reliant on the wing-backs providing width for the team. The two wide full-backs act as wing-backs. It is their job to work their flank along the full length of the pitch, supporting both the defence and the attack.
3-5-1-1
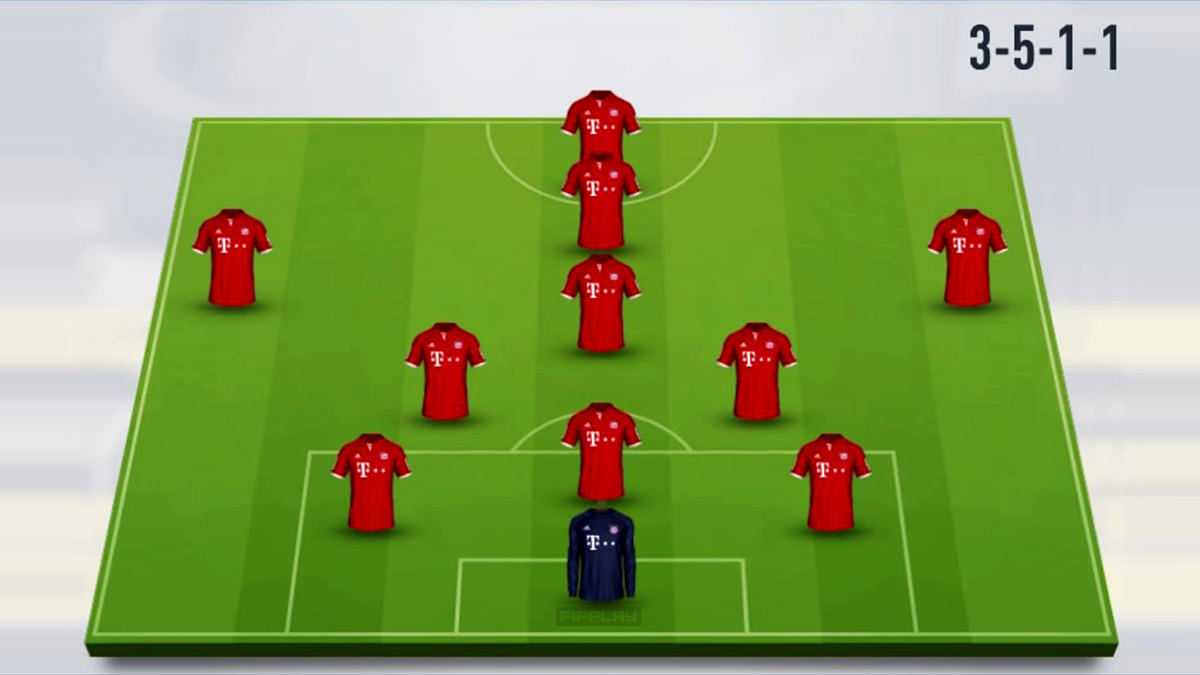
Mode: Attacking
Suitable for the games where you want to concentrate on attacks and score goals.
Same as 3-5-2 formation, but in 3-5-1-1 you have two CF upfront rather than having two ST players besides each other. This formation works better when you're trying to manage your attacks by crosses from the sides and scoring goals from the center of your attacking line.
4-1-2-1-2 Wide
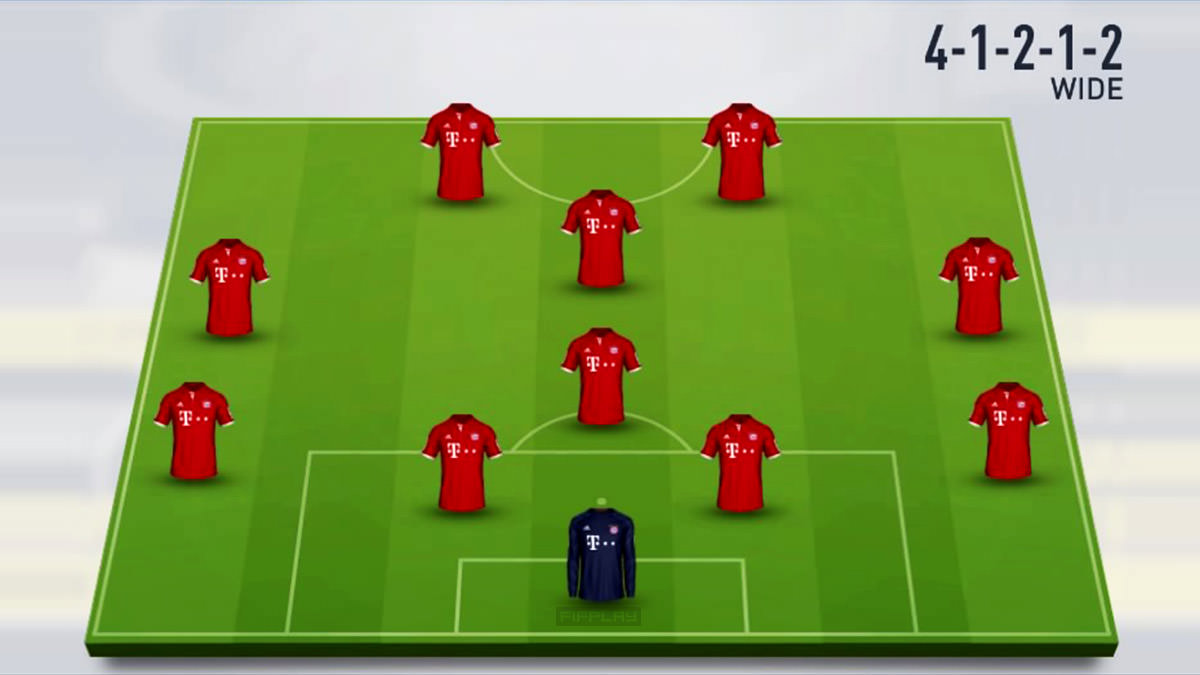
Mode: Attacking / Defensive
Suitable for the games where you want to win the game and concede less goals.
This formation has 4 defenders, 4 midfielders and 2 forwards. 4 midfielders in 4-1-2-1-2 formation are CDM, CAM, RM and LM. The CDM will help the defenders on defending while CAM can join strikers to participate in attacks.
4-1-2-1-2 Narrow
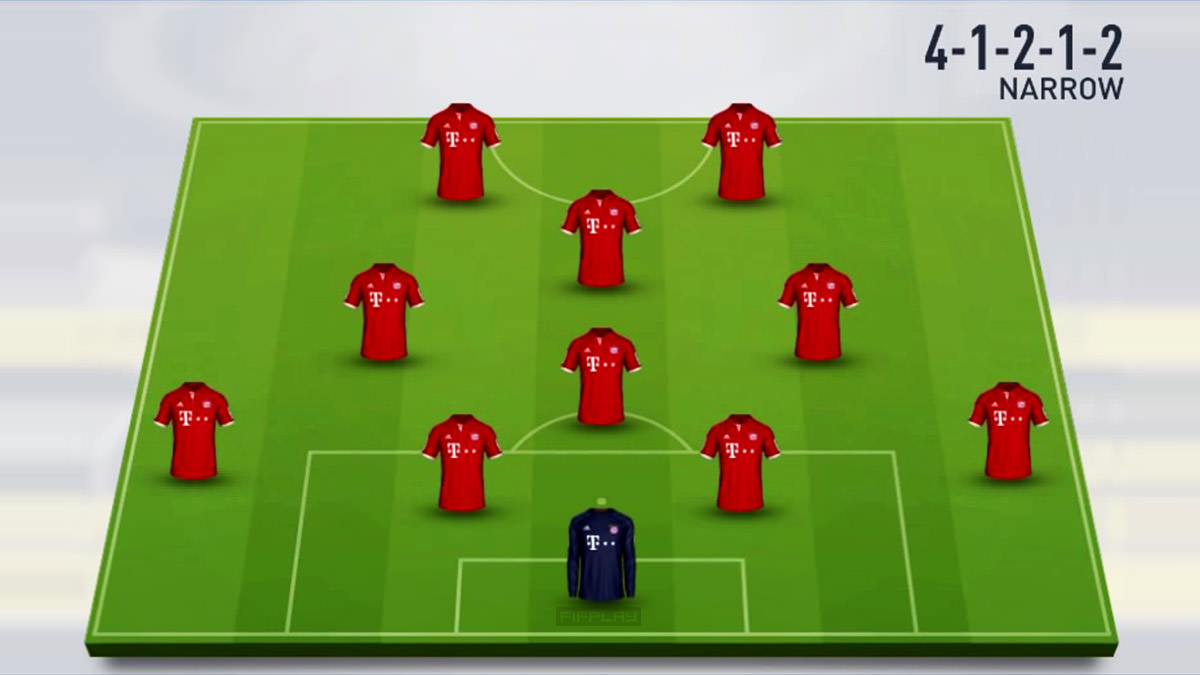
Mode: Attacking / Defensive
Suitable for the games where you want to win the game and concede less goals.
A variation of 4-1-2-1-2 formation, but in this formation there is no wings in the midfield, which means the flank midfielders could be central midfielders (CM) as their roles are more concentrated in the center of the field and they stay closer to each other in compare to 4-1-2-1-2 formation.
4-1-3-2
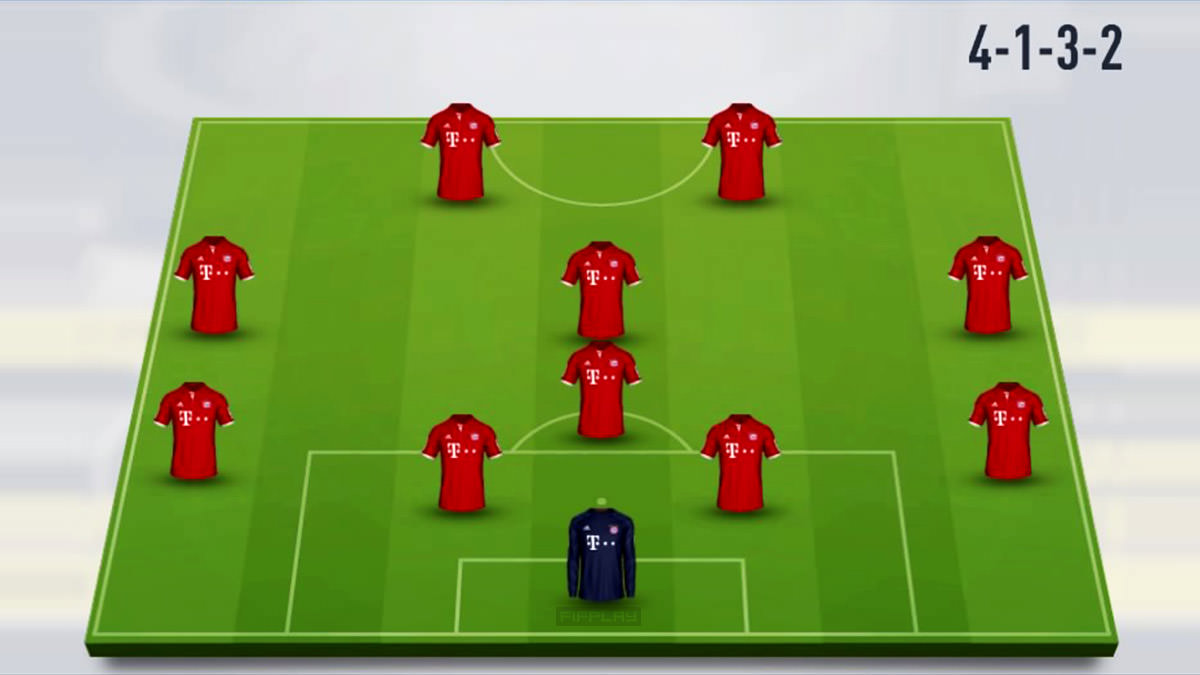
Mode: Attacking (Midfield)
Suitable for the games where you want to do attacks that managed by your midfielders.
The 4-1-3-2 is a variation of 4-1-2-1-2 formation and requires a strong CDM. This allows the remaining 3 midfielders to play farther forward and more aggressively, and also allows them to pass back to their defensive mid when setting up a play or recovering from a counterattack. The 4–1–3–2 gives a strong presence in the forward middle of the pitch and is considered to be an attacking formation.
4-1-4-1
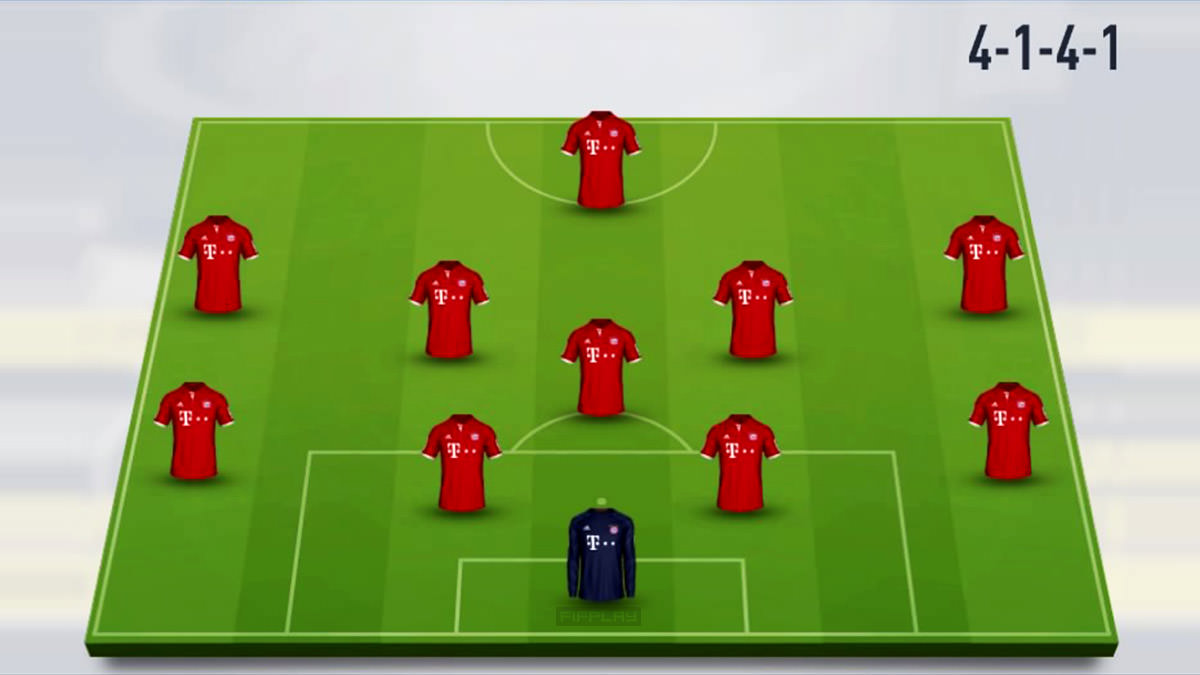
Mode: Defensive / Attacking (Lone Striker)
Designed for the games where you want to have the ball possession and manage your attacks mostly using counters.
A defensive edition of the classic 4-4-2 formation. 4-1-4-1 formation has 4 defenders, 1 defensive midfielder, 4 midfielders and one attacker. Using this formation you will be able to win the ball possession better and to do counter-attacks using your sole striker. Your sole forward is recommended to have a high PAC rate.
4-2-2-2
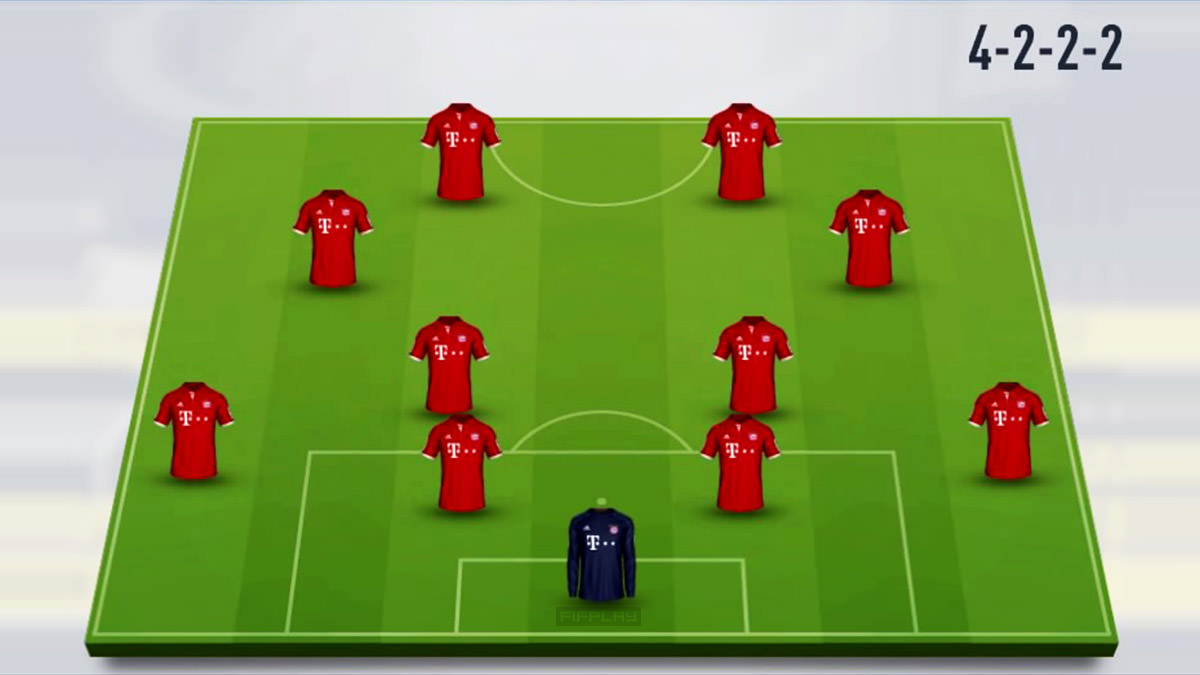
Mode: Attacking / Defensive
Designed for the games where you want to score by ground passed.
Using two strikers in this formation will allow you to create more goal scoring opportunites. Having two CAM players and two CDM players will help your team to be able to perform attacks and defenses with more players. Attacking using 4-2-2-2 formation will require to be more on the ground and using the central area of the field.
4-2-3-1 Wide
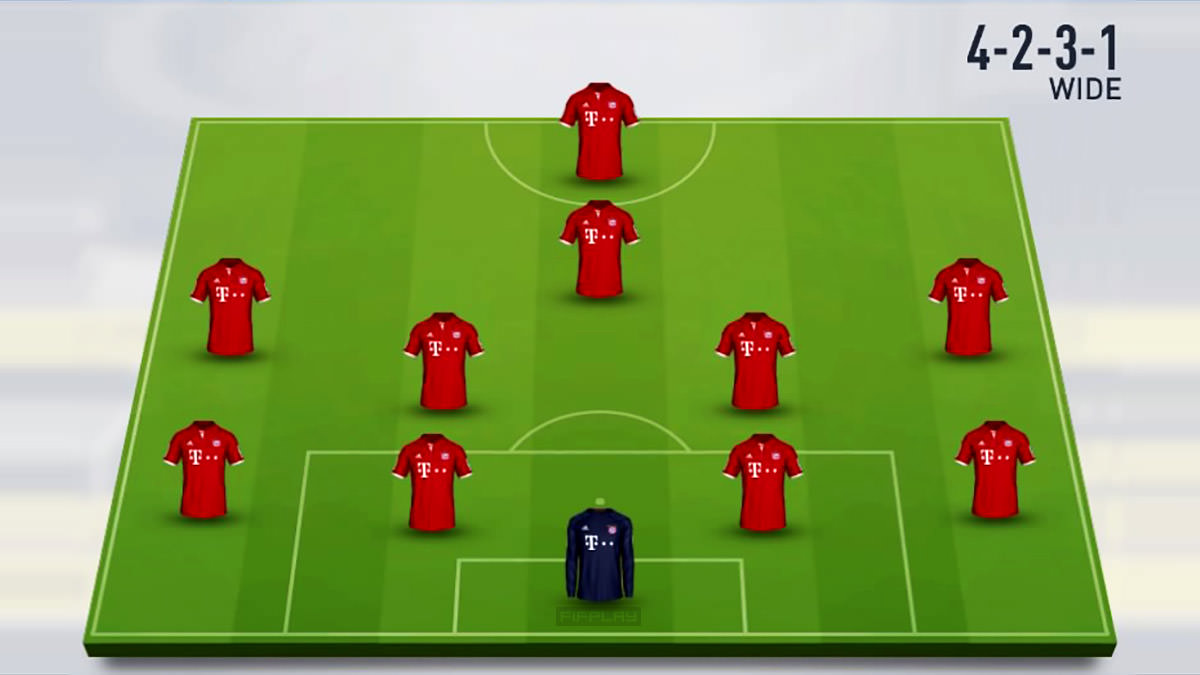
Mode: Attacking (Lone Striker) / Defensive
Suitable for the games where you want to score using a lone striker and be steady on your midfield and defence.
4-2-3-1 Wide is a less attacking version of 4-2-3-1 Narrow formation. Instead of having two CAM players, using this formation you will have a RM and a LM, which could assist your sole striker from the sides and also using the long aero balls.
4-2-3-1 Narrow
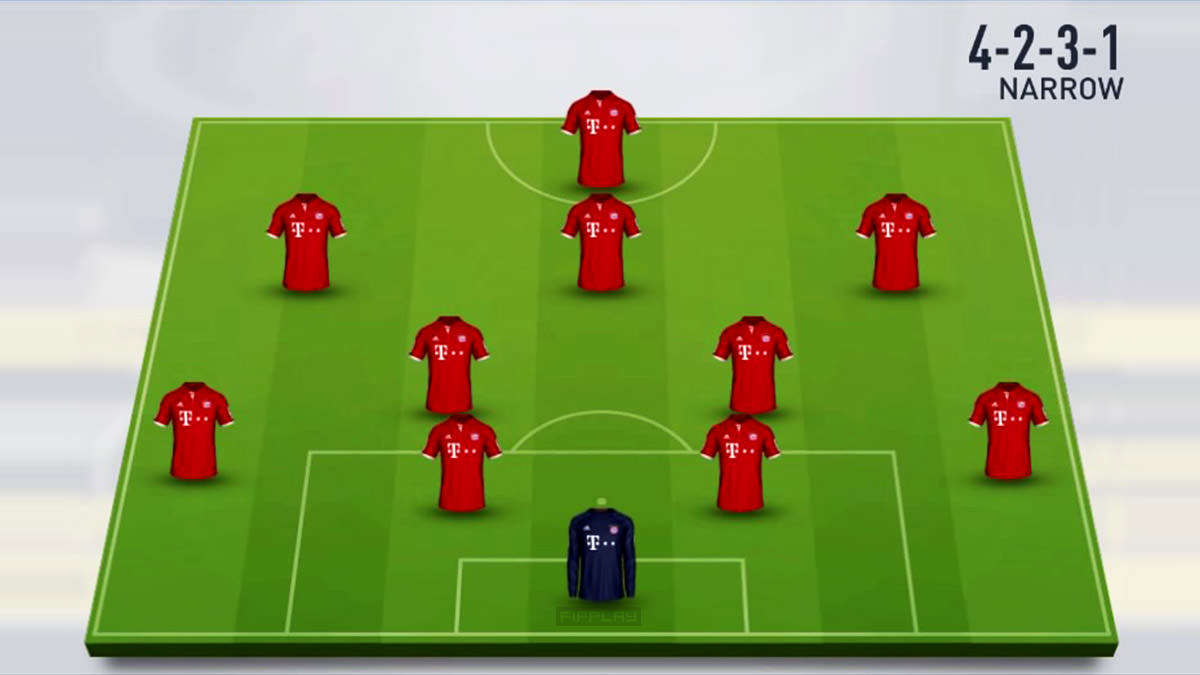
Mode: Attacking (Lone Striker) / Defensive
Suitable for the games where you want to score using a lone striker and be steady on your midfield and defence.
This formation seems to be defensive, but it is quite a flexible formation, as the wingers and the full-backs can both join the attack. The midfielders behind the single attacker are ataccking midfielders (CAM) and the two midfielders behind them are defensive (CDM) which means they are helping the defenders.
4-2-4
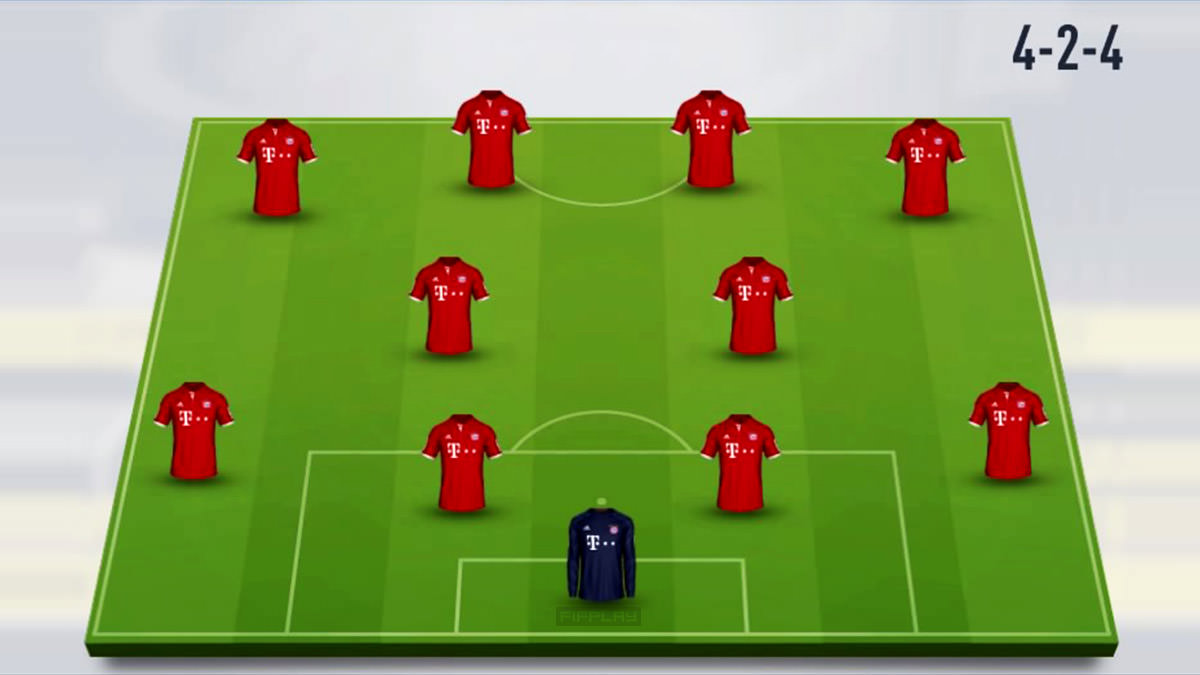
Mode: Attacking / Defensive
Suitable for the games where you need to win and concede no goal.
The 4–2–4 formation attempts to combine a strong attack with a strong defence.
4-3-1-2
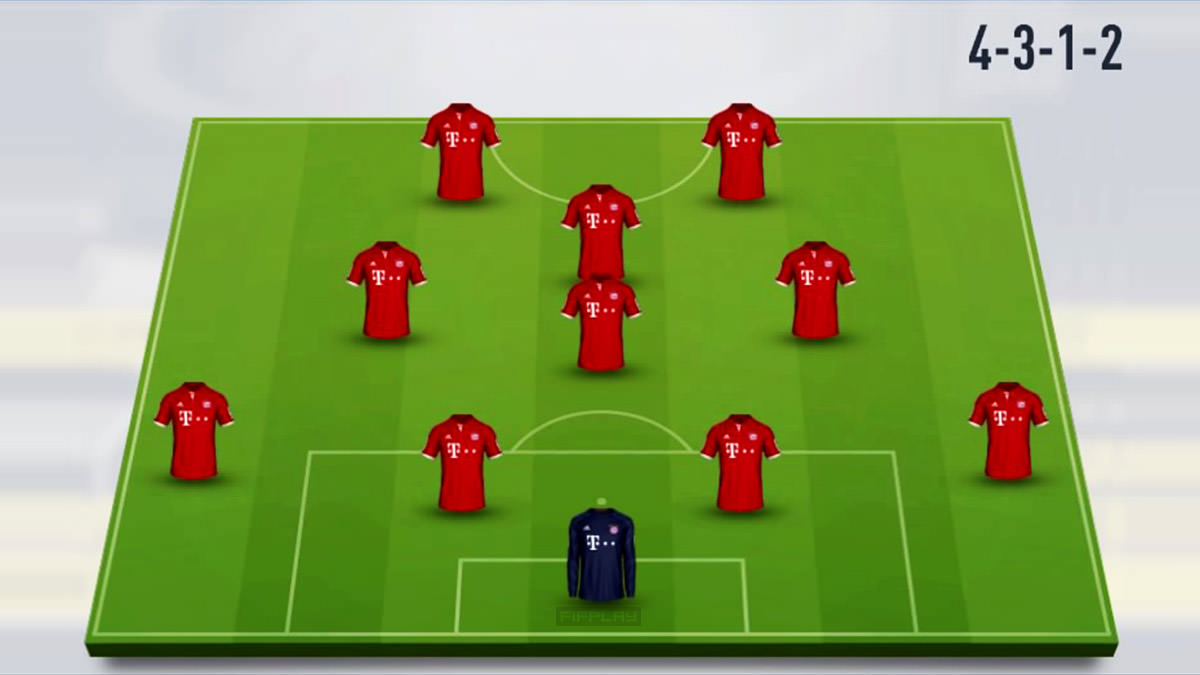
Mode: Attacking / Defensive
Suitable for the games where you want to attack based on moves managed by attacking midfielders.
Two strikers and one CAM in this formation will allow you to do the attack. Three other midfielders (CM or CAM players) will help your attack and defence. The formation focuses on the attacking midfielder moving play through the centre with the strikers on either side.
4-3-2-1
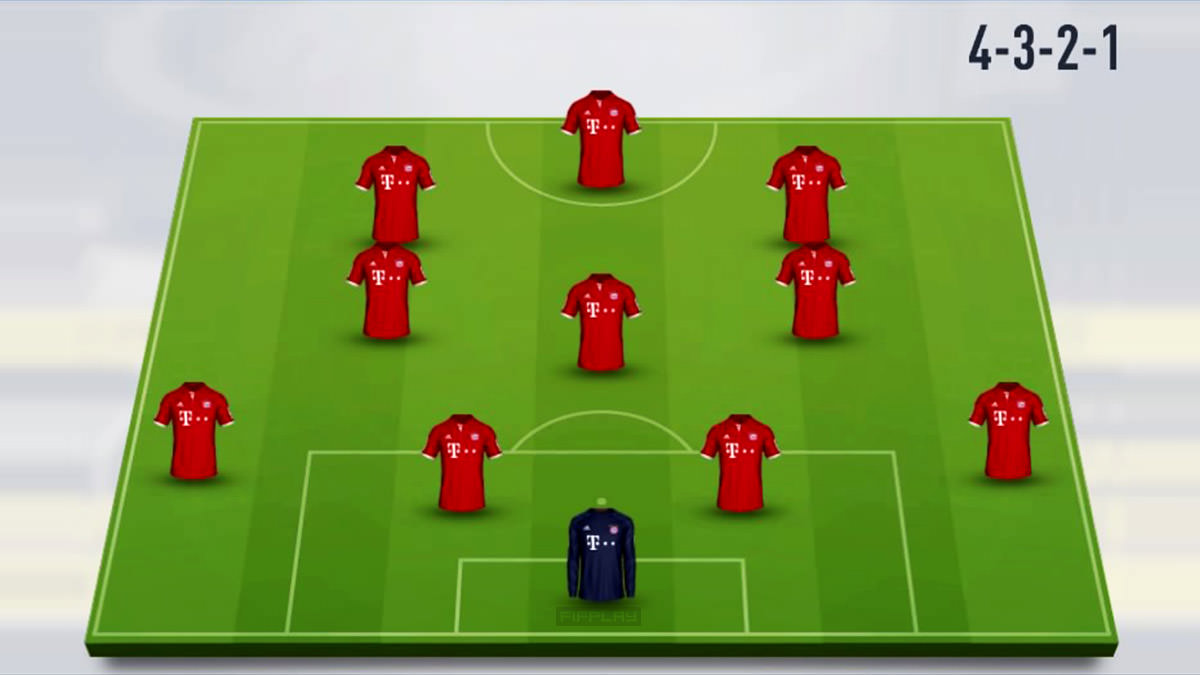
Mode: Attacking
Suitable for the games where you want to attack based on moves managed by attacking midfielders.
Also known as the Christmas Tree formation, the 4-3-2-1 formation is the ultra attacking verison of 4-3-1-2. Using this formation you will have three attackers, which means you are supposed to create more goal opportunites.
4-3-3 Flat
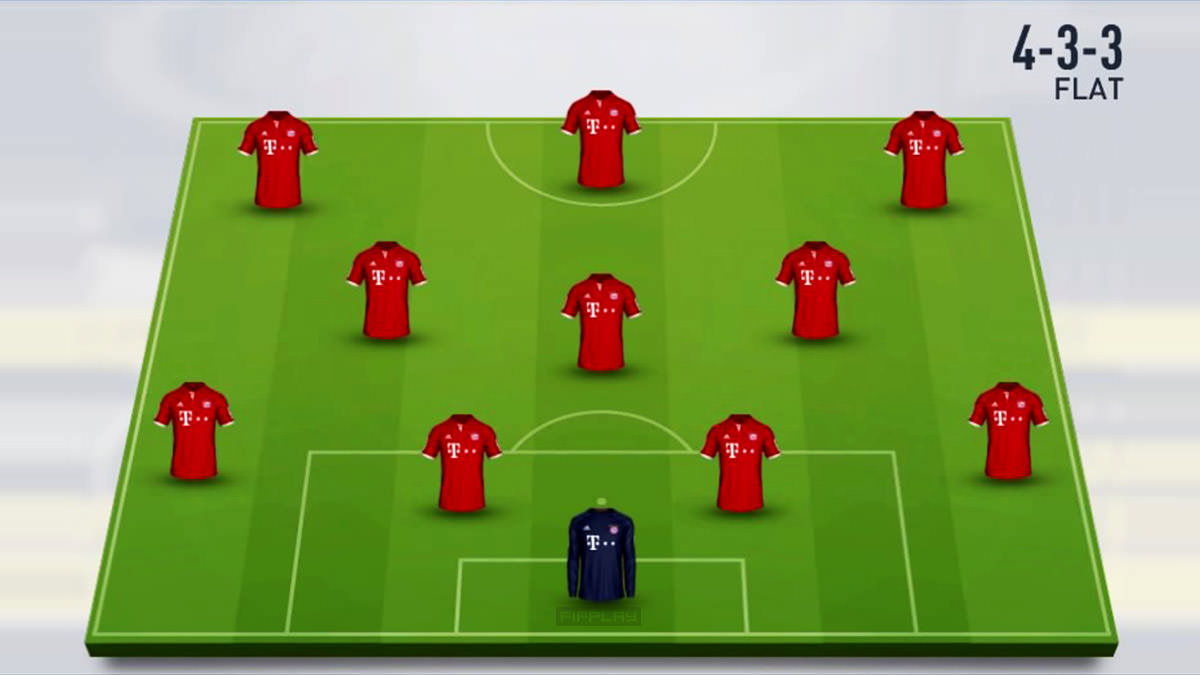
Mode: Attacking / Defensive
Suitable for the games where you want to attack and to have your midfielders help your defenders.
The 4-3-3 is a developed edition of the 4-2-4. This formation is considered as a safe attacking formation where you have three attackers and a flat defensive line.
4-3-3 Defend
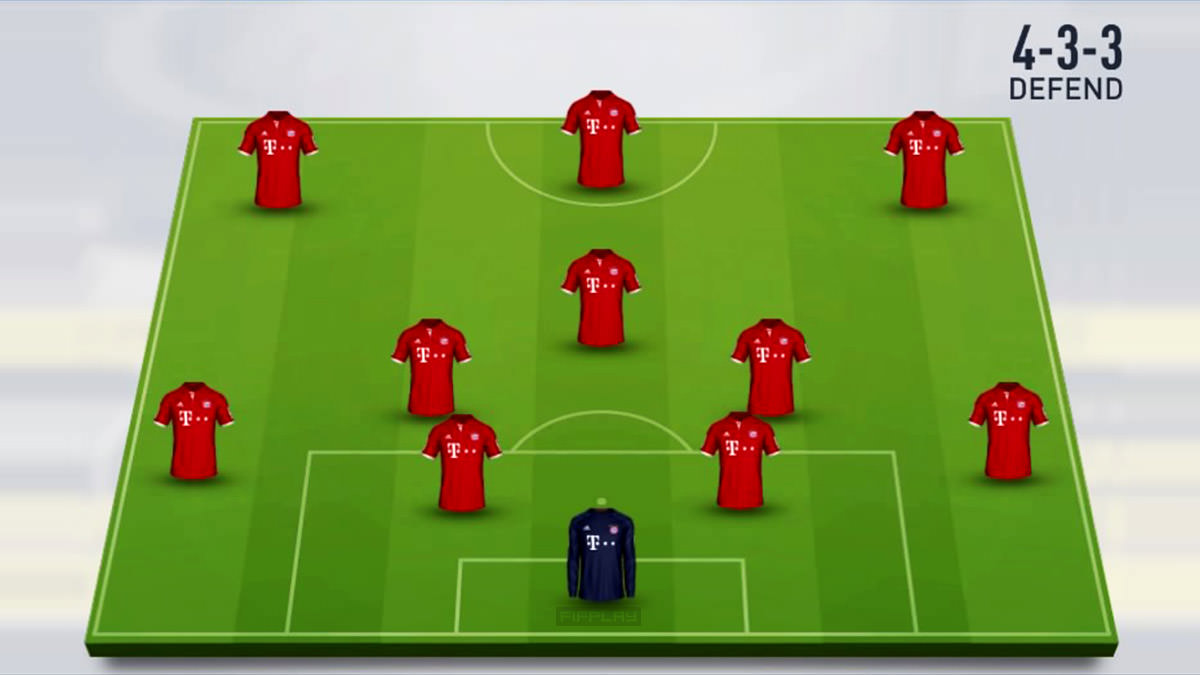
Mode: Attacking / Defensive
Suitable for the games where you want to attack and to have your midfielders help your defenders.
4-3-3 Defend formation is a defensive edition 4-3-3, using this formation you will have two CDM players on the sides and one CM in the middle, so your defensive midfielders will try to block your opponent's counter-attacks.
4-3-3 Holding
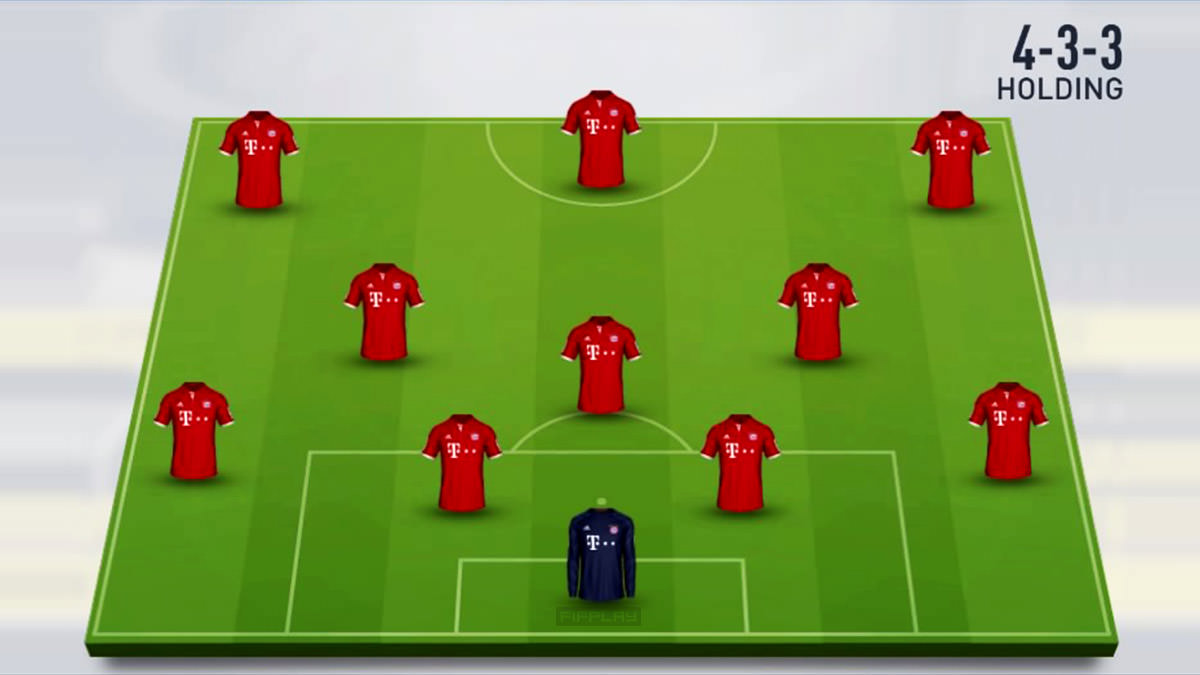
Mode: Attacking / Defensive
Suitable for the games where you want to attack and to have your midfielders help your defenders.
Another variation of 4-3-3 formation, which is slightly more defensive than the 4-3-3 Defend. Using this formation you have LW and RW (the wingers) instead of LF and RF (the typical forwards) for the attack. You have also two CM players and one CDM player who joins on defences.
4-3-3 False 9
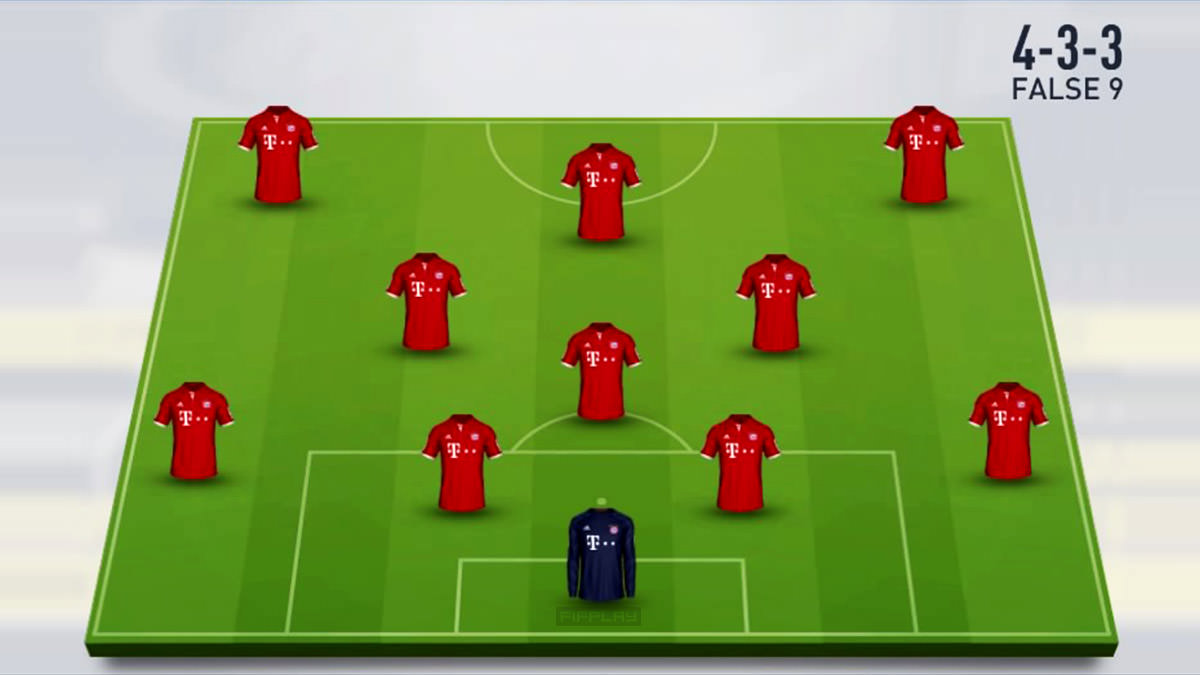
Mode: Attacking
Suitable for the games where you want to do safe attacks (False 9 tactics).
The False 9 edition of 4-3-3 formation, in which your ST or CF player is positioned slightly behind your LW and RW players and is supported by two CAM players on his sides.
4-3-3 Attack
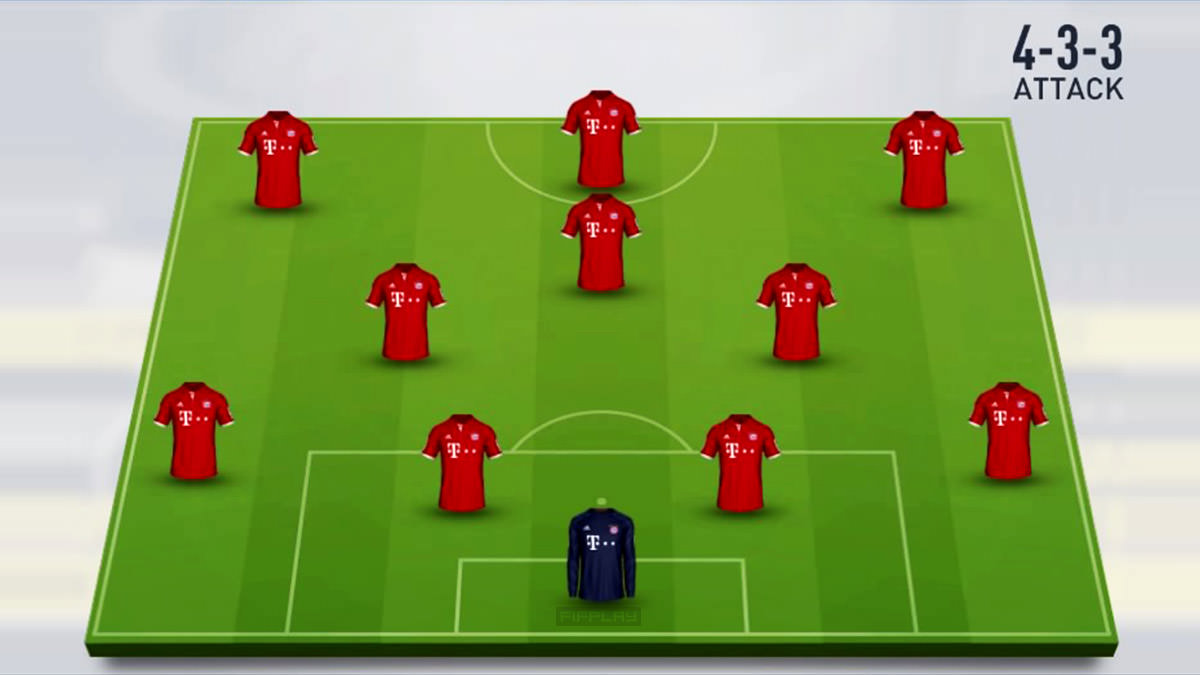
Mode: Attacking
Suitable for the games where you want to do more attacks.
Same as 4-3-3 Flat but more attacking. In this formation, you have an attacking midfielder behind your striker to support him on attacks.
4-4-1-1 Midfield
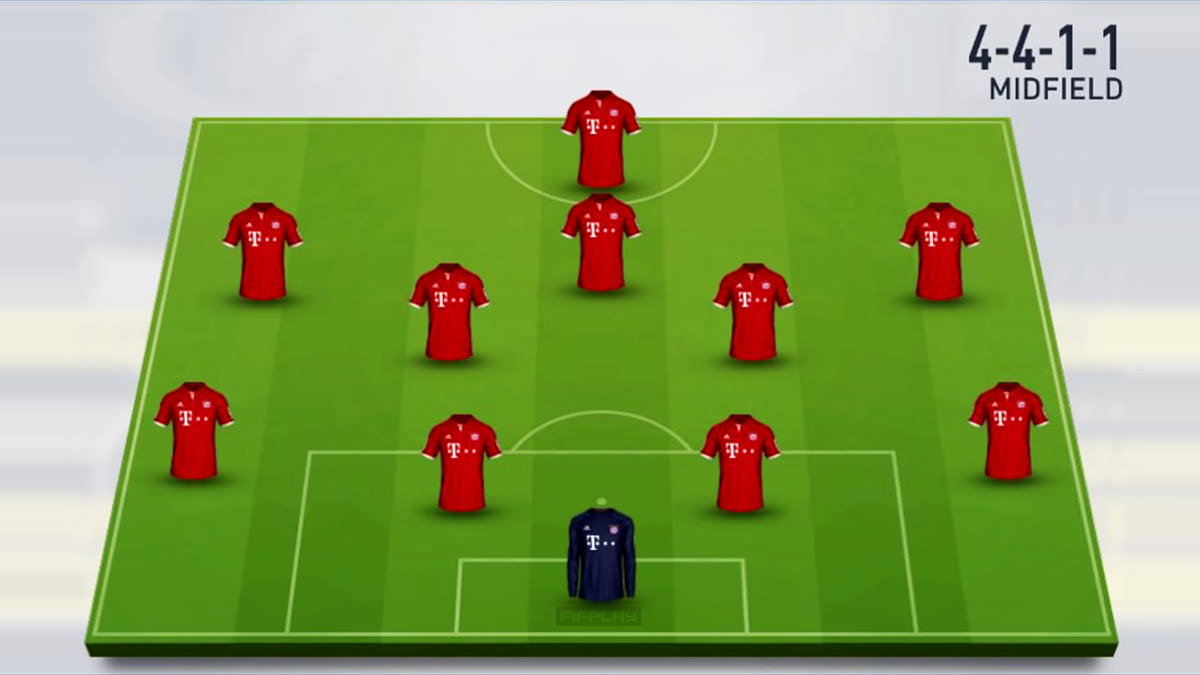
Mode: Attacking
Suitable for the games where you want to do attacks.
A variation of 4-4-2 formation with one of striker playing in front line and is supported by an attacking midfielder (CAM) behind him.
4-4-1-1 Attack
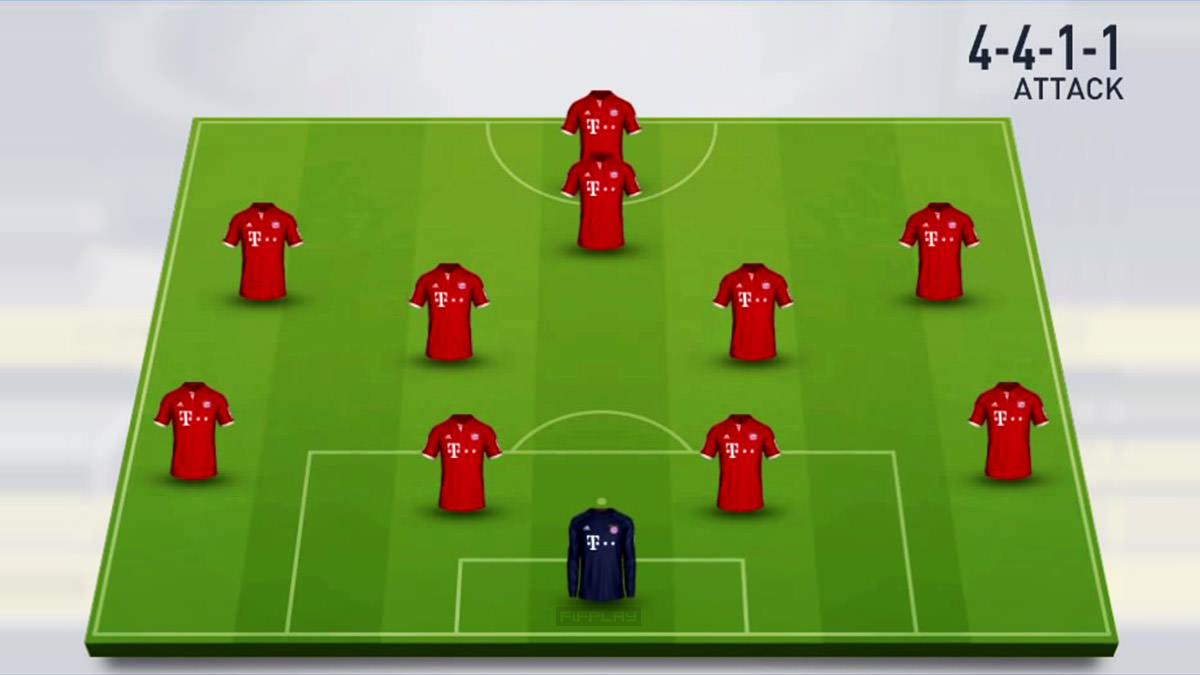
Mode: Attacking
Suitable for the games where you want to do more attacks.
Similar to 4-4-1-1 Midfield formation, but in this formation, instead of having a CAM player, there is a CF or ST player who is positioned slightly behind the main striker.
4-4-2 Flat
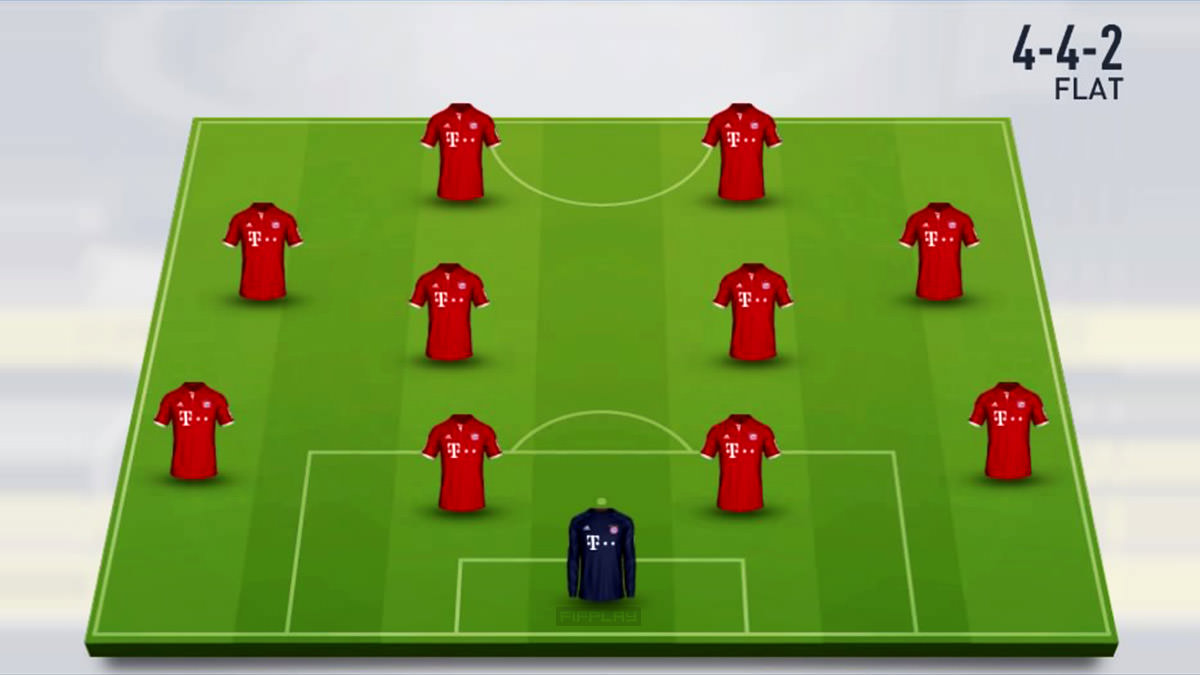
Mode: Attacking
Your midfielders are required to work hard to support both the defence and the attack.
The 4–4–2 formation usually staggers the midfield. The width in the team has to come from the full-backs pushing forward. In the Four-Four-Two formation, the midfielders are required to work hard to support both the defence and the attack.
4-4-2 Holding
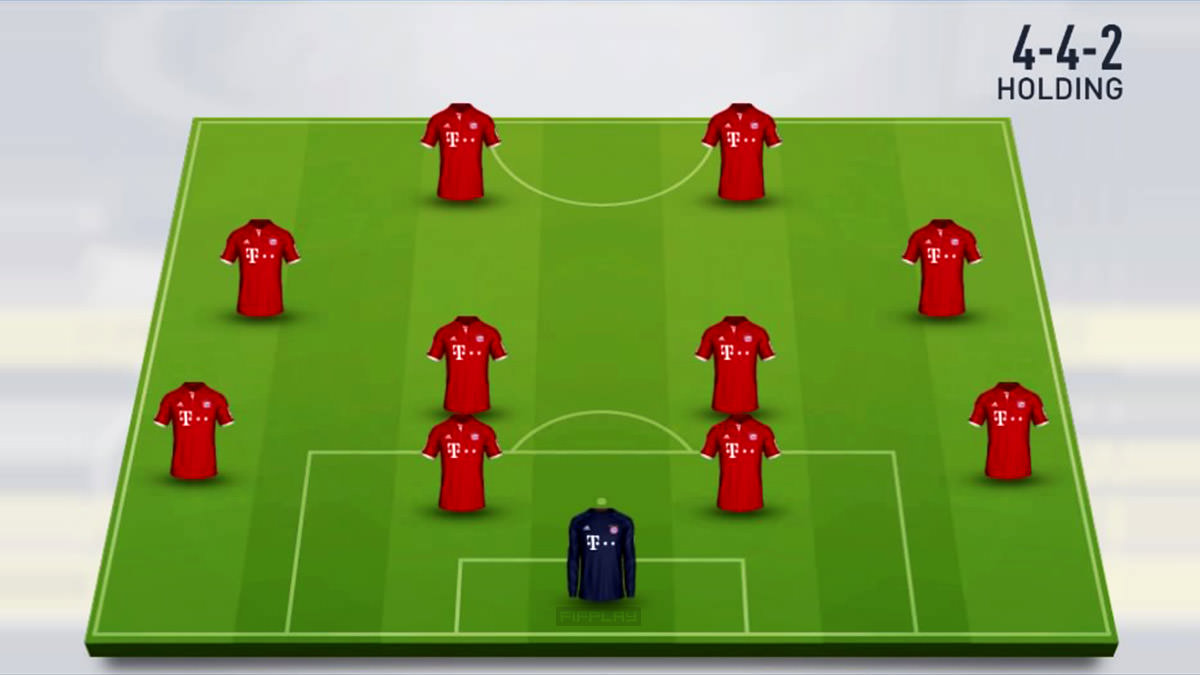
Mode: Attacking / Defensive
Your midfielders are required to work hard to support more your defence.
The midfield defensive edition of the 4-4-2 Flat formation. In this formation, you need to have strong defensive midfielders (CDM) to support the defence.
4-5-1 Flat
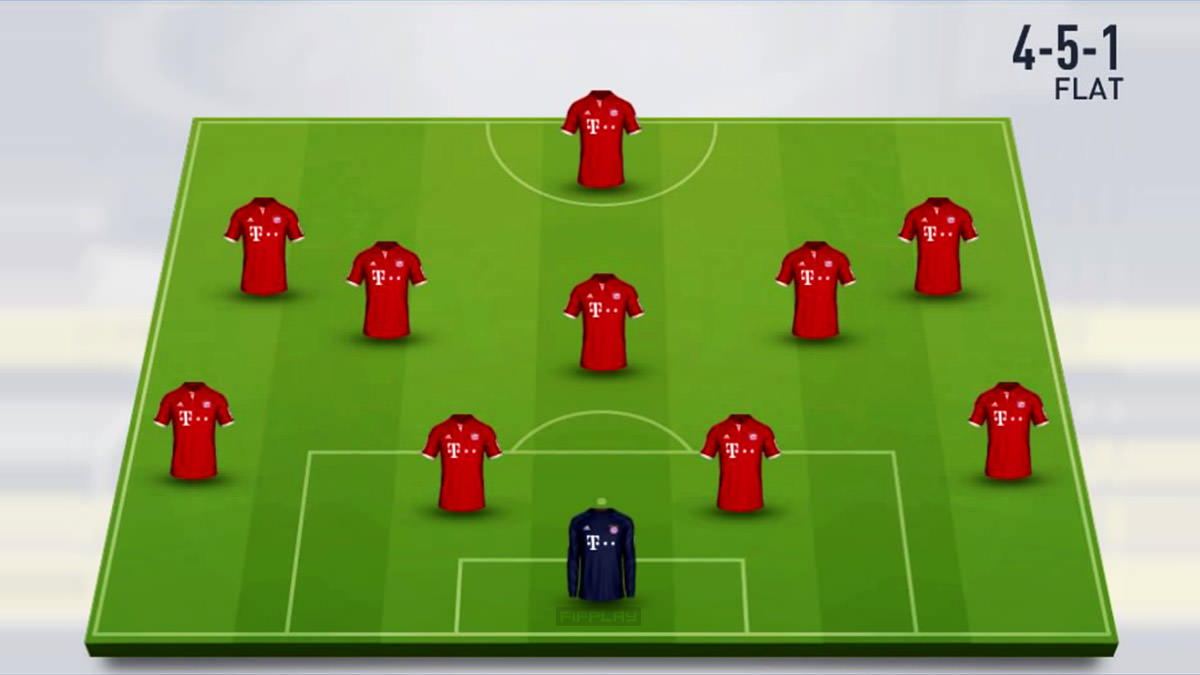
Mode: Defensive / Attacking
Your midfielders are required to work hard to support more your defence.
This formation is originally a defensive formation, however, if the two midfield wingers play a more attacking role, it can be likened to 4–3–3. The formation can be used to tie up or preserve a lead, as the packing of the centre midfield makes it difficult for the opposition to build up play.
4-5-1 Attack
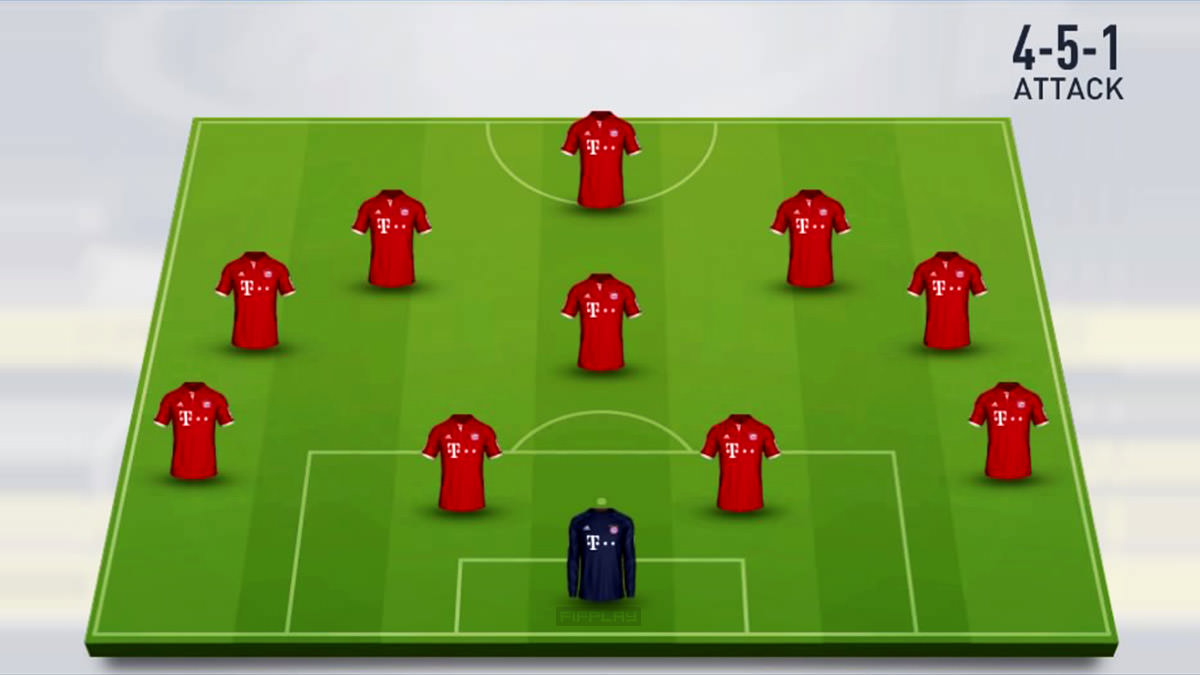
Mode: Defensive / Attacking
Suitable for the games that you need to have safe attacks.
The attacking edition of the 4-5-1 formation.
5-2-1-2
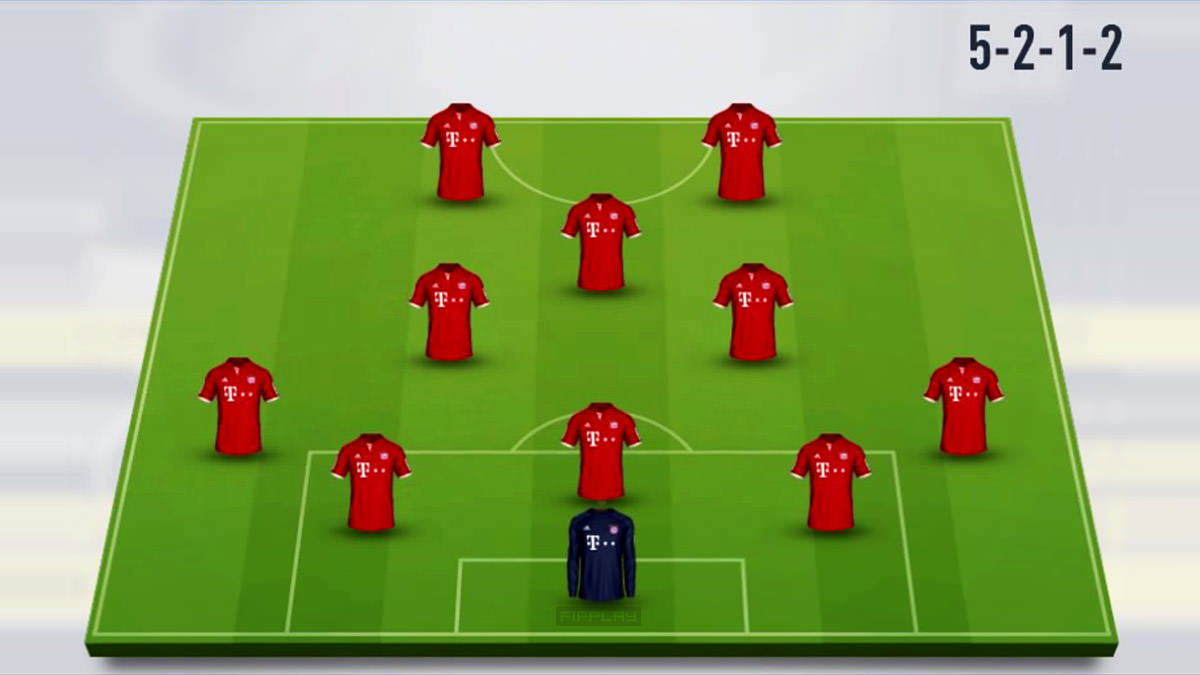
Mode: Defensive / Attacking (Counter)
Suitable for the games that you're trying to do counter-attacks.
In this formation, you will have 5 defenders including 3 central defenders (CB) - one of them is a sweeper and 2 wingers, acting as wing-backs, who will be helping the midfielders and strikers on attacks – Especially on counter attacks.
5-2-3
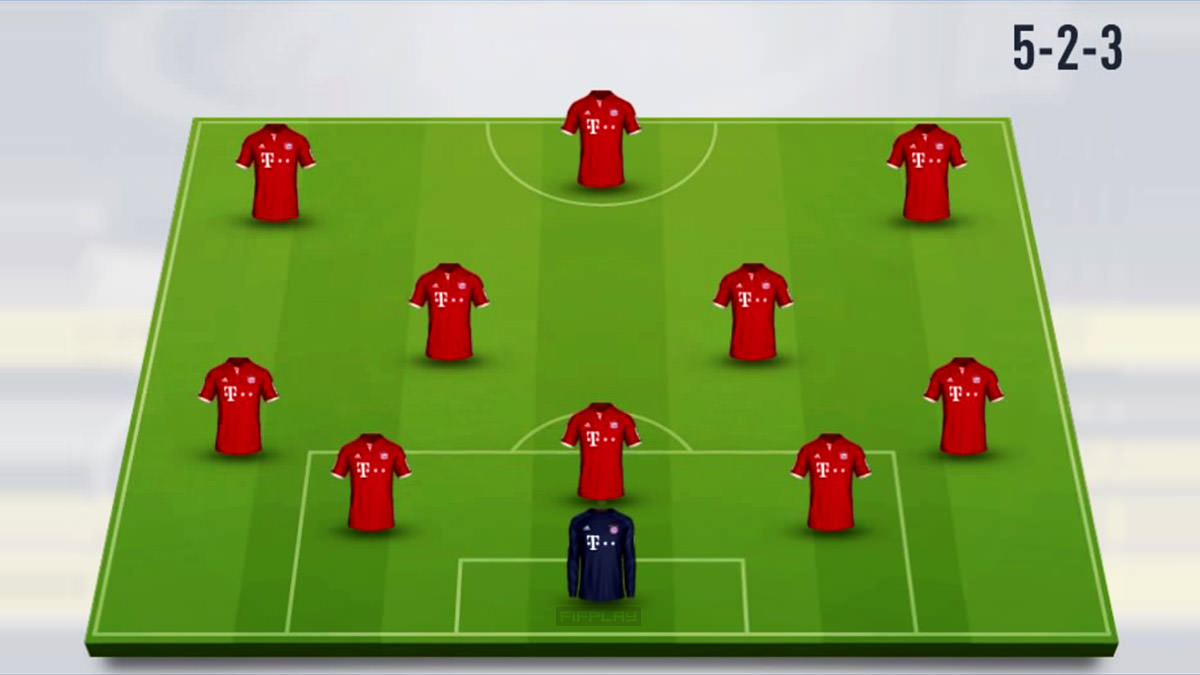
Mode: Defensive / Attacking (Counter)
Suitable for the games that you're trying to do counter-attacks.
A variation of 5-2-1-2 with more attackers.
5-3-2
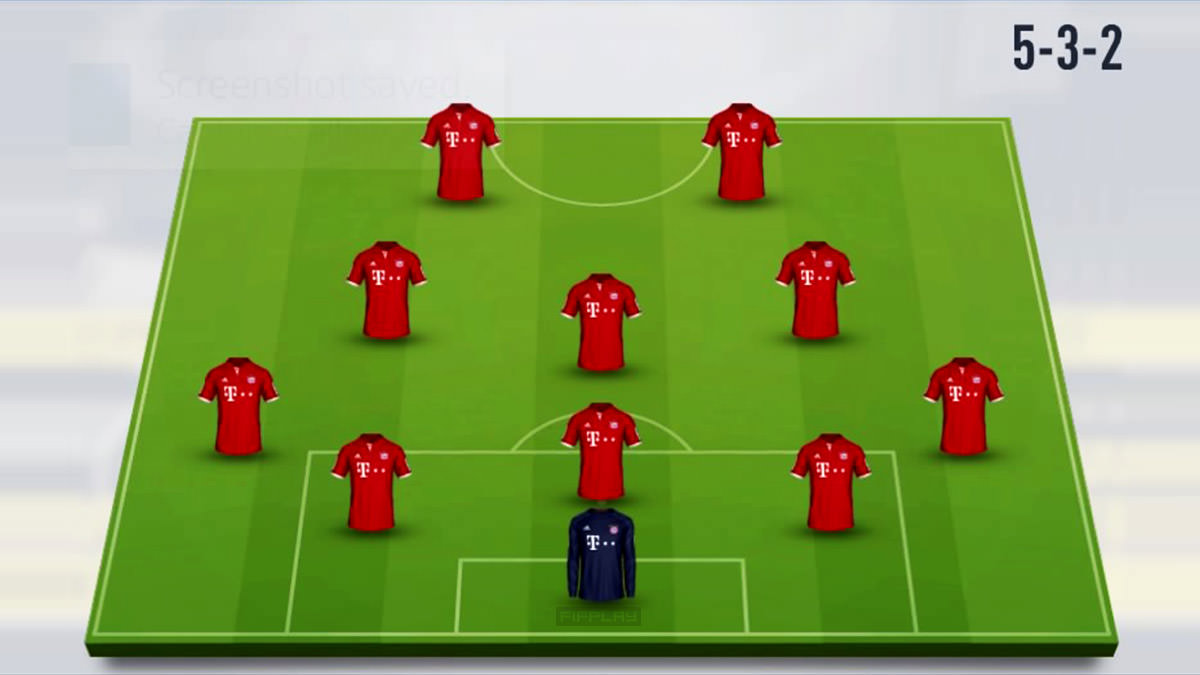
Mode: Defensive / Attacking (Counter)
Suitable for the games that you're trying to concede no goals and do counter-attacks.
The 5-3-2 has 3 CB players (possibly with one sweeper.) This system is reliant on the wing-backs providing width for the team. The two wide full-backs act as wing-backs. It is their job to work their flank along the full length of the pitch, supporting both the defence and the attack.
5-4-1 Flat
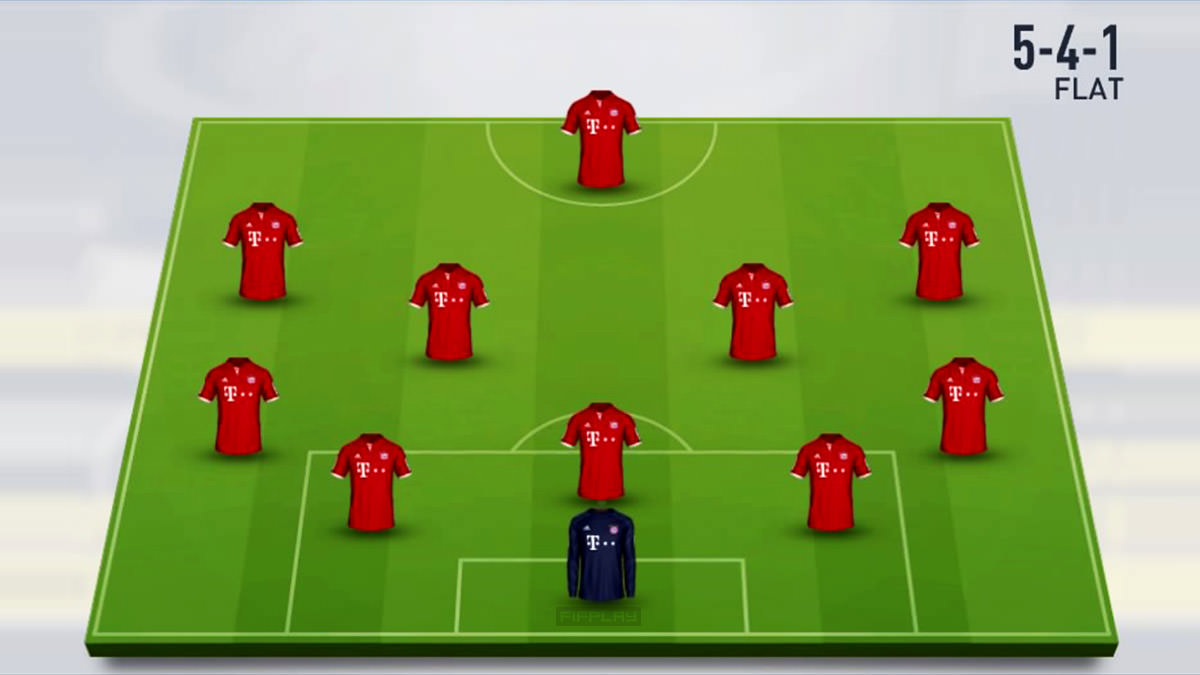
Mode: Defensive / Attacking (Counter)
Suitable for the games that you're trying to concede no goals and do counter-attacks.
The 5-4-1 formation is a particularly defensive formation, with an isolated forward and a packed defence. The lone striker is usually looking to receiving the ball for scoring on counter-strikes.
5-4-1 Diamond
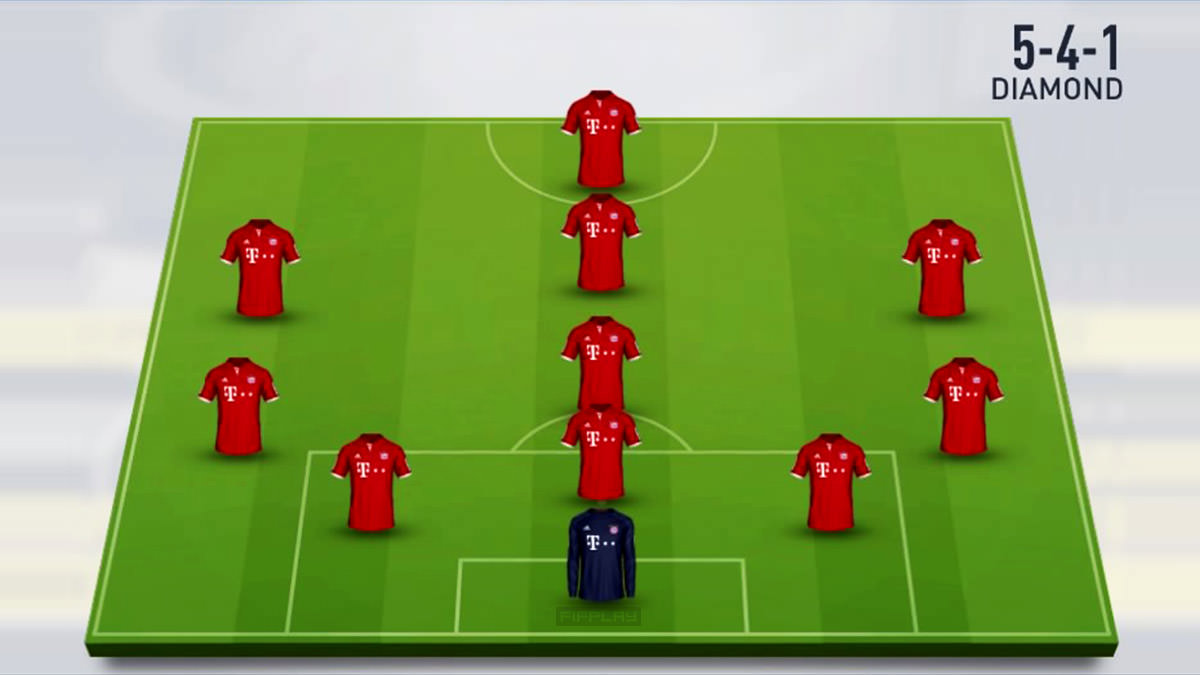
Mode: Defensive / Attacking (Counter)
Suitable for the games that you're trying to concede no goals and do counter-attacks.
A slight attacking edition of the 5-4-1 formation system. In 5-4-1 Diamond, a CAM player is helping the lone striker on the attacks.
Comments
No comments yet. Be the first to share your thoughts!